One of the major selling points of the Wemo® line of products is the ability to control them anywhere you are in the world. But did you know that you can also set them to work autonomously?
Wemo Rules are a set of instructions that you can easily give to your Wemo devices to function on their own without any intervention from you. A Schedule rule is the most basic rule that you can make with the Wemo app. This rule will control your Wemo device to turn ON and OFF at a time you set.
Before creating a Schedule rule, make sure to do the following first:
- Your Wemo device is properly installed and working.
- You have the latest Wemo app from the Google Play™ store for Android™ or the App Store® for iOS, and linked correctly to your Wemo device.
NOTE: If you are using the Apple® Home app for your Wemo device that supports Apple HomeKit™ on your iPhone® or iPad®, you can create a Scene. To know how, click here.
What devices are compatible with this rule?
The Schedule rule type works with the following Wemo devices:
- F7C027 – Wemo Switch
- F7C029 – Wemo Insight
- F7C030 – Wemo Light Switch
- F7C033 – Wemo LED
- F7C043 – Wemo Maker
- F7C063 – Wemo Mini
- F7C059 – Wemo Dimmer
- Wemo LED Partner Products
- WLS040 - Wemo Light Switch
- WLS0403 – Wemo 3-Way Light Switch
- WDS060 – Wemo WiFi Smart Dimmer
NOTE: If you have two Wemo 3-Way Light Switches (Wemo WLS0403) connected to the same circuit to manage the same light, choose only one of the two Light Switches for the rule, otherwise you may encounter rule conflicts.
So where do I start?
Step 1: Open your Wemo app and tap Rules to bring up your rules list.

If you have created Rules before, you will see them listed here as either enabled or disabled. You will need to tap on the plus  sign at the top-right side.
Step 2: Tap Schedule to open the rule creation screen.
sign at the top-right side.Step 2: Tap Schedule to open the rule creation screen.

Step 3: The first part of creating a Schedule rule is to choose the Wemo devices you want to control with this rule. You will be presented with a list of Wemo devices that are compatible to this rule type. Tap on a Wemo device and select from the following of options:
- on until time: This turns a Wemo device ON or OFF at a time you specify.
- on: This turns a Wemo device ON at a time you specify. Once turned ON, the Wemo device will stay ON until you manually turn it OFF.
- off: This turns a Wemo device OFF at a time you specify.

A Schedule rule can control multiple Wemo devices at the same time. These Wemo devices can be set to perform the same action or can perform individual actions independent of each other.
For example, you can have one Wemo device set to turn ON when the rule starts and another one to turn OFF when the rule ends. You can also have multiple Wemo devices all turn ON until the rule ends.
For example, you can have one Wemo device set to turn ON when the rule starts and another one to turn OFF when the rule ends. You can also have multiple Wemo devices all turn ON until the rule ends.
Step 4: After you have chosen the Wemo devices you want this rule to control, scroll down to WHEN. Depending on what actions you chose for your Wemo devices during Step 3, you will see the time options say On, Off, On/Off or Start/End. Tap on the arrow to open the time options for the rule.

Schedule rules have a few options available for the time it will run:
- Time
 : Set a static time.
 - Sunrise/Sunset
 : Have your Wemo device controlled by the rising and setting of the sun.
 - Days: Choose the days of the week you would like your rule to function.
NOTE: Location services must be enabled for Sunrise/Sunset option to work.
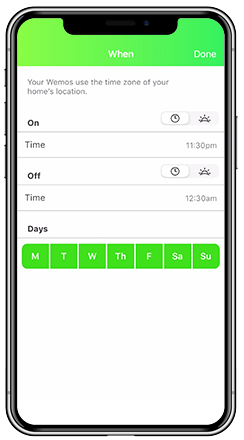
Once you have chosen your time options, tap Done.

Step 5: RULE NAME this is where you can customize the name of this rule to make it easier to identify. Tap New Timer Rule to bring up the on-screen keyboard.

Step 6: Enter the name you would like to give this rule and tap Done to close the keyboard and accept the name.

Step 7: Tap Save.

You have now successfully created a Schedule rule for your Wemo.
Related Articles:
Troubleshooting Wemo device issues
How to configure the Rooms tab in the Apple Home app for your Wemo® Bridge and Wemo Mini
How to disable a Rule using the Wemo App
Related Articles:
Troubleshooting Wemo device issues
How to configure the Rooms tab in the Apple Home app for your Wemo® Bridge and Wemo Mini
How to disable a Rule using the Wemo App


