A computer automatically remembers WiFi profiles it has previously connected to. If a saved network has a relatively similar WiFi name to the network you are establishing a connection to, this may cause a problem. In order to solve this, it is necessary to remove previously saved WiFi profiles (preferred networks) from your computer. This will allow your computer to "forget" previous connections and seamlessly connect to the current one.
This article will guide you on how to remove WiFi profiles on your computer. Select your computer’s operating system below for specific instructions:
Windows® 10
Windows 8 / Windows 8.1
Windows 7
macOS X®
NOTE: Removing network profiles/preferred networks cannot be undone. Make sure you know the WiFi settings of your network to be able to reconnect to it.
Windows® 10
Through Networks
Through the command prompt
Step 1:
Enter “Settings” into the search bar and select
 .
.Step 2:
Click on
 and select Manage known networks.
Select the network you want to remove then click on Forget.

To open the command prompt, enter "cmd" in the search box, then click Command Prompt.


Windows 8 / Windows 8.1
Windows 8 and 8.1 do not have the list of preferred networks that lets you add or remove a profile. However, you can choose to forget the network through the Networks section or delete a profile using the command prompt. Follow the steps below to know how.
The computer must be in range of the WiFi before you proceed with the steps below.
Select
 from the Charms Bar. To open the Charms Bar, move the mouse cursor to the upper right corner of the screen.
 Step 2:
Click on the Network icon (WiFi bars).

Select the network you want to remove and try to connect. When you get an error message that says Can’t connect to this network, click Forget network.


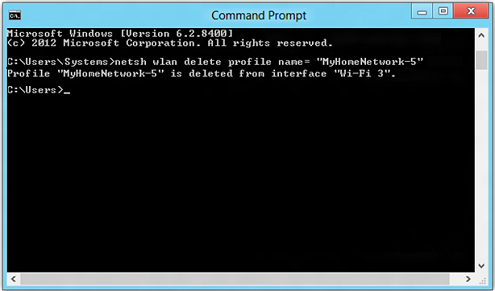
The command prompt in Windows 8 and 8.1 lets you delete a profile or show all WiFi profiles saved on your computer using a specific command. To open the command prompt, go to Search > enter "Command Prompt" in the search box, then click Command Prompt.

Windows 7
Computers running Windows 7 may show the error message, “The settings saved on this computer for the network do not match the requirements of the network”. Removing the previous WiFi profiles or preferred networks resolves this issue. For instructions, follow the steps below:
Click the Pearl
 button and click on Control Panel.
Step 2:
In the Control Panel window, select Network and Sharing Center.

Step 3:
Click on Manage wireless networks.

Step 4:
Select the network profile you wish to remove, make sure it is highlighted then click Remove.

Step 5:
A window will prompt you to confirm the removal of the network profile you selected. Click Yes to continue.

You have successfully removed the network profile.
macOS X®
NOTE: The OS X® version 10.7.3 (Lion) is used here as an example.
Click on the Apple® menu and select System Preferences.

Step 2:
Click Network.

Step 3:
Click on the Advanced button.

Step 4:
Select the WiFi profile you wish to remove under the Preferred Networks box, make sure it is highlighted then click the minus (-) button. Click OK to finish.

You have successfully removed the network profile.
You can now try to reconnect to WiFi to save the profile to your computer or device.


